
FAQ
Ring Size Chart
To find your ring size: Simply measure the circumference (distance around) your finger (with something flexible, such as a strip of paper or piece of string, and a ruler with milimeter measurements). Or, measure the diameter (distance across) in milimeters of a ring you currently wear. Find the nearest measurement on the chart below. That's approximately your ring size. (When in doubt between two sizes, it is always safer to go to the next larger ring size. This ensures your new ring will fit you.)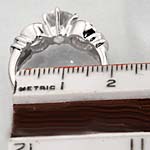
An example of measuring the diameter of a ring. The inside of this ring is approximately 18mm in diameter, making it a size 8 on the chart below.
the numbering below is US sizing and the lettering is Australian sizing
| Ring Size | Circumference (in mm) | Inside Diameter (in mm) |
| 4 | 48 | 15 |
| 5 or J 1/2 | 51 | 15.3 |
| 6 or M | 54 | 16.2 |
| 7 or O | 56 | 17.1 |
| 8 or Q | 59 | 18 |
| 9 or R 1/2 | 62 | 18.9 |
| 10 or T 1/2 | 65 | 19.8 |
| 11 or V 1/2 | 68 | 20.4 |
| 12 or Y | 71 | 21.3 |
| 13 or Z 3/4 | 74 | 22 |
| 14 or Z3 | 77 | 23 |
| 15 or Z6 | 80 | 23.9 |
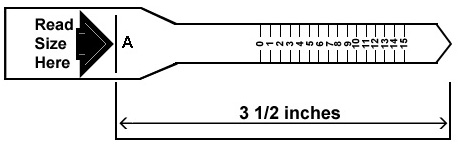
For a downloadable and printable ring sizer, click here (a new window will pop up)
Instructions for teeth whitening gel
- brush and floss teeth
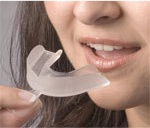
- Place a small bead of gel per tooth in the frontal portion of the tray (same as the image below for the remin gel) for the front 6-8 teeth (approx 1/4cc). One syringe allows 6 treatments for the upper and lower (12 individual tray treatments). Be careful not to overload the tray. Less is best. Place the tray in your mouth for approximately 20-30 minutes. There is no point leaving them in longer as your saliva neutralizes the gel. (this can be done 2-3 times daily). Repeat the process until the desired results are achieved. Then you only need to top up occasionally to maintain the whiteness (every month is recommended). If you have any gum or tissue irritation ensure you use less gel next time or wipe it off with a cotton bud after you have placed the trays in your mouth. the gel is not designed to be left in your mouth overnight
- Remove trays, rinse (your mouth and the trays). Clean the trays with cold water before and after each treatment.
Instructions can be downloaded and printed here, (a new window will pop up)
- the remineralisation gel is used after the whitening process has been completed
- Rinse out your trays before applying a very small bead in the front and back of the trays

- Let it sit in your mouth for 4-5 minutes.
- Remove the trays and do NOT rinse your mouth
- Wash and rinse mouth trays thoroughly
- It is recommended you remineralise just before going to bed for a thorough nightime remineralisation process, Remineralise once a week during the whitening process and once a week thereafter for a healthy smile
Instructions for teeth whitening light
- Insert your mouth trays with the gel in them. Place your lips over the clear plastic mouthpiece and turn the light on by pressing the white button. For first time users we recommend that you do a 30 minute treatment. For followup treatments you will probably only need to use the light for 10 or 20 minutes to receive the desired results.
- Twist the battery covery counterclockwise until the arrow on the battery cover is aligned with the arrow on the light unit. Pull and remove cover. Insert both batteries + side up. Replace battery cover and turn clockwise until the arrow on cover is aligned with arrow on light unit
Instructions for thermo fitting teeth trays
Step 1: Practice Makes Perfect
This step is important to perfect before molding the mouth trays. Without placing the water in boiling water, place the tray in your mouth and suck the air out of the tray. When you suck the air out the tray, the tray will fit tighter due to a lack of air this is exactly what you want to feel. You will do the same when you retrieve the trays from the boil ing water to contour the tray to the inside surface of your teeth. Do the same procedure with the other tray with your lower teeth, once you are comfortable - continue to the next step.
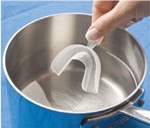
Step 2: Just Add Water
Boil a pan of water approximately 4" in depth so that the tray will be immersed keeping the tab above the water. After the water has come to a boil, remove the water from the heat and place the tray in the hot water, but not in the boiling water. Leave in water for 5 seconds, please note the trays become very pliable at this point and will tend to stick together. While the trays are in this state avoid twirling them as it may ruin the natural contour of the tray.
Step 3: The Fitting
Remove the tray from the water and quickly place the tray around your teeth and suck the air out like you did in Step 1 and hold for around 10 seconds. Do the same for the lower tray. This will mold the tray to the unique shape of your mouth.
Step 4: Trimming The Trays
Once you are satisfied with the fit, trim the front tab away from the tray with scissors. Make sure it is flush with the front surface of the tray.

What is the difference between hydrogen peroxide vs carbamide peroxide
Hydrogen peroxide is a stronger, faster bleaching agent than carbamide peroxide, that's why it's usually recommended for use only by dentists. Carbamide Peroxide is a lower-dosage formulation of hydrogen peroxide that's safe for at-home use - or for use over a longer period of time, like with whitening kits that feature mouth trays.
Carbamide peroxide breaks down to about one third hydrogen peroxide, so an 16% carbamide peroxide solution has the same effect as a 6% hydrogen peroxide solution. Another reason carbamide peroxide is used in at-home products is because it is much more stable than hydrogen peroxide, which deteriorates rapidly on store/dentist shelves.
What is the best way to care for the gold plated jewelry?
Do not wear your jewelry in hot tubs and swimming pools. Take jewelry off when using laundry or cleaning products. NEVER, NEVER clean it with bleach.
Use jewelry cleaner and a soft cloth to clean your gold plated jewelry .If you do not have jewelry cleaner, you can use mild soap and warm water. Never use any harsh cleaners such as bleach or abrasives.
To store gold plated jewelry, wrap each piece separately in a soft cloth. Lay herringbone chains flat so they do not kink. Always remember to remove your jewelry before sleeping, bathing or exercising.
Will plated jewellery tarnish?
regardless of what anyone tells you or you read, ALL gold plated rings eventually tarnish. alot of factors come into play as to how long this period is (ie how often worn, how long, acidity of skin, pirspiration etc). ALL costume jewelry is designed to only be worn occasionally hence the reason is does not cost $100's or even $1000's. It is not designed to be worn in the shower or swimming.
Do you have a minimum order?
no
Where are you located?
We are located in South Australia
How quickly do you ship once you receive the order?
Orders are shipped same or next business day once payment is received and cleared. we have a cut off time of 2.30pm ACST
During Holidays orders may be delayed up to one day.
What forms of payment do you accept?
Bank transfer (internet transfer, over the counter deposit)
Money order In AU$
Paypal (credit card, debit card, bank transfer, cash balance, e check)
Can I use your online photos?
All materials contained on this site are exclusively the property of cdWon.com
and may not be reproduced, modified, or distributed without our prior written permission.
Do you send samples?
No
How do I know what your items are made of?
Each item is listed whether it be solid yellow gold, yellow gold plated or white gold plated
Do you ship international?
Yes, we ship to all countries with payment through PayPal, bank transfer or money order received in AU$
Do you have a catalog that you can mail to me?
no we use our online site
Do you drop ship?
yes we do
What kind of shipping methods do you use?
We use the postal service for all shipments
How do you calculate shipping?
We calculate shipping by fixed rate $0 per order for standard delivery anywhere in the world, registered mail and express delivery for australia are included options
Do you accept returns?
Yes we gladly accept items for exchange for item value. Please note if a different size is required from the original order a $5 s/h fee applies. All items returned without proper R/A# are returned to the customer. The item must be returned in the same condition. ie unworn/unused and not damaged in anyway